manage_images [ ] ToDo: thomas: check and compare with J3x version (same folder) and images ... (1) The topmost rectangle selects all images which is useful for batch processing.
The selector beside the image information selects this image. (2) Order Number The order number of this image may be increased or decreased or set manually. (3) Status A green 'OK' tell that the image is published. (4) Image Title Title displayed to user in view if enabled.
The title of the image may be different to the image file name. it will be present
with image name on upload and changes with the property edit or on single image edit. (5) Image Name Real file name used on the server (6) Parent gallery name Each image is assigned to a gallery (7) Author The author logged in when creating the gallery (8) Date Created Creation Time of gallery (9) Hits Count on views / appearances
(10) ID Internal ID of image for reference or matching in other list Click on the DropDown_Button Action (1) Publish Assign published to the selected Images (2) Unpublish Assign unpublished to the selected Images (3) Archive Assign archived to the selected Images (4) Check in Remove "Checked out" of the selected images (5) Trash Move selected images into trashed items (6) Batch Uses the selected images for the tasks in the batch form Possible batch tasks: (1) Filter Options (2) Select gallery Images of selected gallery will be shown (3) Columns sorting Defines the columns the list will be sorted by and also the direction (4) Limit per page It defines the count of images which will be shown on one page (1) Select a gallery as destination for copy or move of selected images (2) Add properties This button leads to the properties from (see below) and will open
the selected images. The title and description can be changed for a batch images
also image can be flipped and rotated there. (3) Move to Batch processing: The selected images can be moved to the selected gallery. (4) copy to Batch processing: The selected images can be copy to the selected gallery.Image list columns


Image(s) task buttons

Image(s) search options

Images: Batch process to add properties

[ ] ToDo: fill out see: RSGallery2_Project\Documentation\J!3x\GalleriesBackend\GalleryEditView.md (Needs completion of edit view first, kann für vorhandene Teile gestartet werden) (1) Title Is derived from the file name when uploading. May have been changed when it was edited in image property view. (2) Filename File name of uploaded file on server. May be different from the image name on the PC due to character restrictions in URL or server operating system (3) Gallery Tell or changes the parent gallery (4) Description Text which is displayed in the gallery view if enabled in the configuration (5) Status Publish or hide the image (6) Ordering Change appearance order (7) Owner Tells user who uploaded the image (8) Item Preview Shows a medium sized view of the image (9) Display parameters Add parameters used in display of the image to overwrite settings from the configuration for this image. (10) Links to image Tells the path of the image as URL link (1) Save Saves the changes (2) Save and close Saves the changes and exits the edit view (3) Save and new Saves the changes and opens an empty edit view (4) Cancel Exits the edit view (5) Rotate left (6) Rotates right (7) Rotate 180 (8) Flip horizontal (9) Flip verticalImages Edit View

Use the form of Name='value', one assignment per line.
Sadly the name of the item has to be derived from the config control name.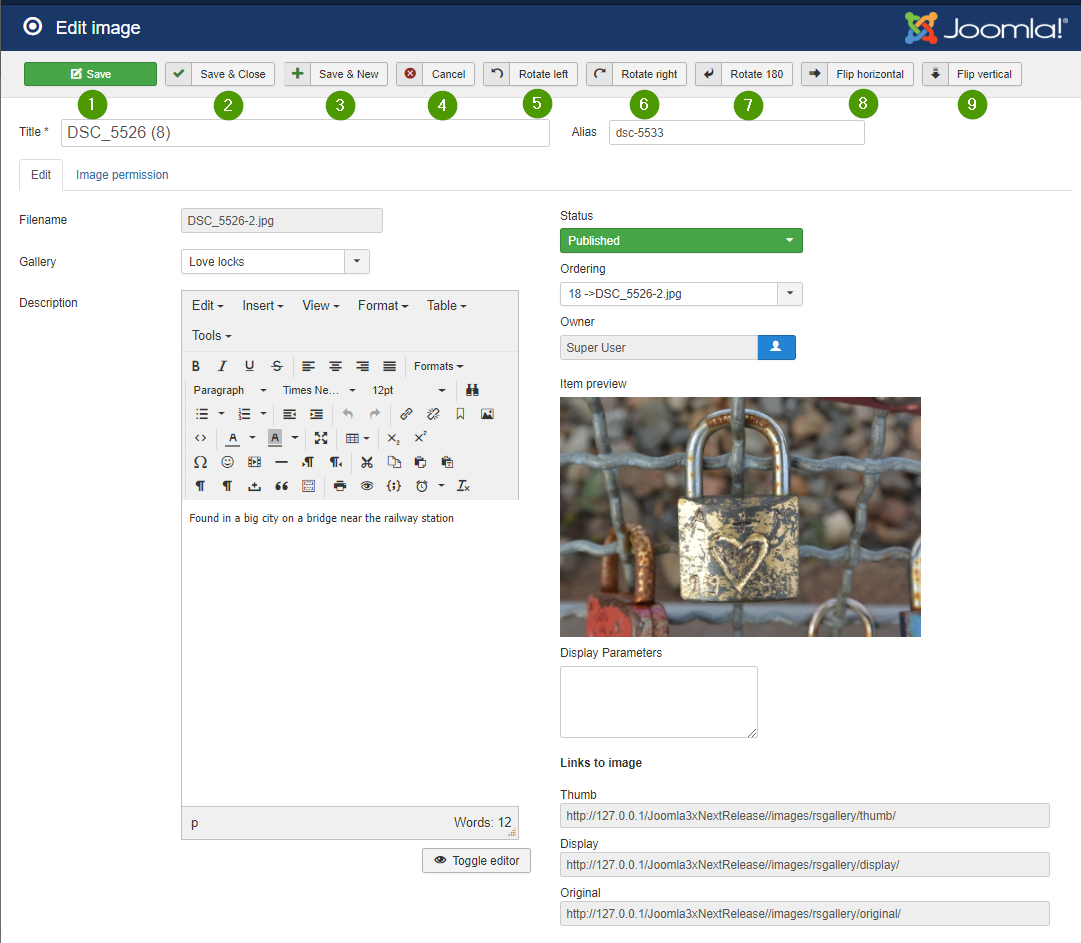
[ ] ToDo: thomas: check to be used This form enables to the properties title and description for a batch of images at the same time. It is reached normally over the upload form. It can also be reached with selected images over the batch button in the images list form. (1) Title The title is preset on creation. It may be edited here. The title may be different to the uploaded image name when the name already existed. Then the next name already existed. The next free number is appended. (2) Gallery The gallery name can't be changed. (3) Description The description may be changed with the standard editor like in the edit single image form. Save and close Save changes and continue edit on the same images. Save Save changes and continue edit on the same images. Archive Assign archived to the selected Images Trash Move selected images into trashed items Delete All same images can be selected for deleting. Clicking on delete Button will delete the selected images from the RSGallery2 database and the created image files. (5) Rotate left Rotates selected images 90 degrees against the clock. (6) Rotate right Rotates selected images 90 degrees with the clock. (7) Rotate 180 degrees Rotates selected images 180 degrees. (8) Flip horizontal Flips the selected images horizontal. The bits move from left to right.The bottom of images keeps being the bottom. (9) Flip vertical Flips the selected images vertical. The bits move from bottom to top.The left/right side of the images keeps being of the left/right side. (10) Select all All images will get a set hook in the box below the image. This can be used to delete, rotate or flip selected images. (11) Select images The image will get a set hook in the box below the image. This can be used to delete, rotate or flip selected images. (12) Close Go back to page Manage images.Add image properties

(4) Actions

DropDownButton Rotate